Audio Plugins, Mixing, Reviews
How To Use Xfer OTT Compressor: Pro Tips Inside!
Discover why the Xfer OTT compressor is a staple in every electronic music producer’s plugin library. As one of the most popular free multiband compressor plugins out there, it’s no surprise that you’ve likely encountered it or already used it, and the best part is that it’s completely free at Xfer website! Download Xfer OTT Here
However, I saw and heard many producers utilize the OTT VST without fully understanding its parameters, sometimes leading to unfavorable results.
But this article will help you demystify the OTT free compressor by Xfer Records, ensuring you know exactly what each setting does and how to use the OTT compressor effectively.
Let’s get started…
A bit about OTT

OTT, designed by Xfer Records, the creators of Serum, a leading synth plugin in electronic music, is a powerful multiband compressor that manipulates audio with both downward and upward compression. “OTT” stands for “Over The Top,” aptly named for its ability to transform audio signals into intense, robust sounds through heavy compression across three frequency bands.
This plugin uniquely combines compression techniques to enhance punch, body, and low frequencies, making it ideal for aggressive music styles. However, it’s also versatile enough for softer genres with more nuanced settings.
The truth is that many use this compressor without knowing 100% what is happening or doing to the plugin, often leading to a muddy sound that ultimately ends up being detrimental to the song. That is why there is no official OTT guide, so we will explain to you what function each parameter has.
Quick Start
Interface and Controls
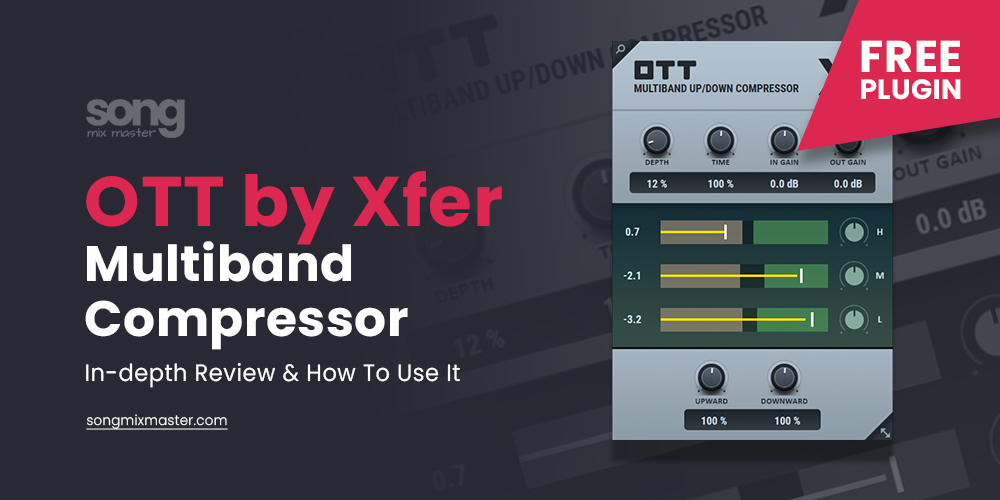
The Xfer OTT compressor, though compact in its design with a limited number of controls, packs a significant punch, allowing for profound alterations to your sound.
Understanding and using these controls effectively can drastically improve your audio production outcomes. Here’s a detailed breakdown of each control and its functionality within the free OTT compressor plugin:

The Depth control determines how much of the incoming signal is processed by the compressor. A slight adjustment can begin to exert a noticeable compression effect. This control is particularly beneficial for electronic music genres that often require heavier compression.
For quieter musical genres, lower settings can provide a more subtle enhancement. The Depth control spans from 0% to 100%, offering a wide range of intensity.
The Time control adjusts the attack and release times of the compression. Unlike typical compressors that measure time in milliseconds, OTT uses a percentage scale ranging from 0% to 1000%. Higher percentages result in longer compression durations, thus controlling the signal more steadily and reducing noise.
Lower settings speed up the compression process, emphasizing quieter signal parts and potentially introducing more noise due to the rapid compression times.
The Input Gain sets the level at which the signal enters the OTT, ensuring that the signal is at an optimal level for processing.
Output Gain – After processing, the signal’s volume might either increase or decrease. The Output Gain control adjusts the processed signal back to the original input level, maintaining consistency in loudness.
The High control affects the volume of high frequencies. It functions like a bell EQ curve, allowing for the attenuation or boosting of this frequency range. This control is ideal for refining the high-end detail after compression, enhancing clarity, or reducing harshness depending on the desired outcome.
Similarly, the Mid control adjusts the mid-frequency range. This can be used to either dampen or accentuate the mids, helping to balance the overall effect of compression on the audio.
The Low control mirrors the functionality of the High and Mid controls but focuses on the low frequencies. It is particularly useful for enhancing the depth and presence of bass-heavy elements like kick drums and basslines.
Additional Tips
Keep in mind that the High, Mid, and Low controls act like bell EQ filters. They enhance the perception of the compression effect rather than directly altering the compression intensity. These controls should be used post-compression to fine-tune the frequency response of your audio.
Upwd – Upward Compression
This parameter has the function of adjusting the amount of upward compression, so if when adjusting the compression bars you are not happy with the amount of effect you achieved, you can increase the amount of overall effect for the three bands, or attenuate it a bit if you went too far.
What you can perceive with low values is a cleaner signal, while with higher values, the signal will acquire more noise, and the quieter parts of the signal will stand out more.
This process leaves the louder sounds relatively untouched, only boosting the quieter parts. It can be very useful for compressing background drums for example.
Dnwd – Downward Compression
The function of Dnwd (downward compression) is to control the amount of compression achieved through the adjustments in the compression bars.
This is the conventional form of compression most are familiar with. It targets louder sounds that exceed a set threshold, reducing their volume to ensure a more consistent level across the audio spectrum.
So if you are not happy with the compression adjustment you achieved with the compression bars, you can use this parameter to increase the effect applied to the bands without having to change the relationship between them.
Recommendations! These two controls are usually left both at values of 100% to maintain a noticeable and marked effect without becoming too aggressive.
Therefore, we recommend using them in cases where you want something very drastic for a creative effect, as easily by increasing especially the upward compression, you could increase the peak levels of the signal to the point of clipping.
So when you increase especially do it with moderation, especially if you already set the High, Mid, and Low bands. Since it would be three times the increase, and this has an effect on the levels of your signal.
Usage Examples
Now let’s talk a bit about how we can use OTT on some sounds. Remember that OTT is a compressor that works very well for electronic genres, and this is where it has earned its fame, as it allows heavy compression that stands out in this type of genre.
Below are some usage examples based on our experiences with OTT. Remember, these are suggestions and starting points. Feel free to adjust and tailor these settings to fit your sound preferences and production needs.
Drums
Drums are the ones that benefit the most from OTT since its upward compression helps to have those Kicks, Snare, claps, etc… with a lot of punch and power.
- Kicks: To add body and punch, start with the Depth control to determine the signal amount affected by OTT. We recommend setting the Time at 100%. Increase the high-frequency compression slightly for added punch and brightness. Adjust the low-frequency bar to enhance weight and body, maintaining the Upward (Upwd) and Downward (Dnwd) controls at 100%.
- Snares: For snares with long sustain, set the initial signal processing amount, and adjust the Time to below -50% to allow lower parts of the snare to breathe, adding a natural color. Boost the high-frequency for more punch and adjust the mid frequencies to add body. Use downward compression on low frequencies to eliminate unnecessary lows, adjusting Upwd and Dnwd to enhance the body without overly compressing mid and low frequencies.
- Drum Groups: For full drum loops or drum groups (drum mix bus), use subtle settings to avoid drastic changes to the sound. Set the Time around 100% and adjust the Upward control to below 30% for a cleaner sound if drums were previously compressed individually. Use the compression bars subtly to slightly enhance the punch.
Vocals
Using OTT on vocals requires a careful approach to preserve the natural quality of the voice.
- Parallel Processing: Instead of applying OTT directly, use a parallel setup. Create a send from the vocal track to a new auxiliary channel with OTT. Start with a Depth of 30-50% to avoid over-processing while maintaining clarity.
- Time and Compression Settings: Adjust the Time control for natural or aggressive effects, starting around 50% for balance. Use upward compression sparingly, starting at 30% to enhance quieter parts, and set downward compression between 70% to 100% to manage peaks effectively.
- Blending: Mix the processed signal from the OTT channel back to the main vocal track to taste, controlling the level of compression enhancement while keeping the vocals’ natural dynamics.
By following these steps, you can effectively use OTT on vocals to enhance their presence and consistency within the mix while maintaining their natural quality and expressiveness.
Synth Leads
OTT can significantly increase the presence and brightness of synth leads. Begin with a Depth of 30-50% and adjust the Time to maintain punchiness. Use the High and Mid frequency controls to fine-tune the lead’s brightness and body.
Bass Lines
For bass lines, a Depth of 50-70% can highlight nuances while integrating the bass smoothly into the mix. Adjust the Low frequency control to add weight, and tweak the Time to match the track’s rhythm.
Dynamic Pads
Apply OTT to atmospheric pads to accentuate their textures and layers. Set the Depth to 20-30% with higher Time settings to soften dynamics and emphasize lushness. Adjust the High and Mid controls to tailor the pads’ brightness and warmth.
OTT Alternatives

Cramit is another “over-the-top” free multiband compressor that stands out as a robust alternative to OTT by Xfer Records. Offering the same core functionality, Cramit also brings a bonus: the ability to apply saturation to the signal.
This plugin includes seven different saturation algorithms, providing a wide range of options for signal coloration. The saturation can be applied either pre or post-compression, allowing for even greater flexibility in shaping your sound.
Conclusion
Xfer OTT is not just about controlling dynamics; it’s about bringing sounds to life, making them more engaging and impactful. Whether you’re looking to add punch to your drums, clarity to your vocals, or vibrance to your synth leads, OTT can be a valuable addition to your audio processing plugin library.
Free Download Link: Free Xfer OTT Compressor
If you like to explore new plugins, Cramit is a good alternative for the Xfer’s OTT compressor with the ability to add harmonics before or after compression that can enhance your results even further.
Discover more plugins in my list of the Best Free Compressor VST Plugins
Disclaimer: Any references to any brands on this website/webpage, including reference to products, trademarks, brands and companies, are provided for description purposes only. We don't have any association with or endorsement by these brands or companies. Some of the links on our blog may be affiliate links. This means if you click on these links and make a purchase, we may earn a commission at no extra cost to you.
Need Professional Mixing & Mastering?
You may also like to read...
Motion: Dimension – Delay and Reverb Fusion In One Plugin
My Buyer’s Guide for Professional Studio Headphones
Vocal Recording Mastery: How to Capture the Perfect Take
How To Mix an 808 Bass In Trap & Hip-Hop Music
How to Sell Your Music Online: A Guide for Musicians
Songwriting Secrets: Write Lyrics That Resonate with Your Audience