Uncategorized
How To Do FL Studio Sidechain Compression Like a PRO
Sidechaining in FL Studio is an essential technique for achieving professional-sounding mixes. Often referred to as sidechain compression, this method allows you to create space and clarity between conflicting audio elements, such as the kick drum and bass line. By using FL Studio’s versatile tools, you can easily implement sidechain compression and elevate your music production.
FL Studio offers various methods to achieve sidechain compression. One popular approach is using the Fruity Limiter stock plugin for sidechaining, which provides precise control over the dynamics of your tracks. This technique, often called side chain ducking, ensures that the volume of one track is reduced when another track plays, allowing each element to stand out in the mix.
In this tutorial, we will guide you through the steps to set up sidechaining in FL Studio, using both the Fruity Limiter and the Peak Controller to achieve the best results. Whether you’re new to FL sidechain techniques or looking to refine your skills, this guide will help you master the art of sidechain compression in FL Studio.
Why Use Sidechain Compression?
In any musical arrangement where the kick drum and bass line play simultaneously, there is a high potential for frequency clashes, leading to muddy mixes, lack of clarity, and unwanted distortion. Sidechain compression resolves this by temporarily reducing the volume of the bass whenever the kick hits, ensuring each element has its own space in the mix.
Step-by-Step Guide to Sidechain Compression in FL Studio Using the Fruity Limiter
Step 1: Load Your Samples
First, load your kick and bass samples or loops into FL Studio. For this tutorial, I will use some Trap kick and bass loops from Hex Loops. Ensure each audio loop has its own channel in the mixer.

Regardless of whether I work in FL Studio, Studio One, or Cubase, I always name my channels before starting work for an easier and more intuitive workflow.
Step 2: Set Up the Sidechain
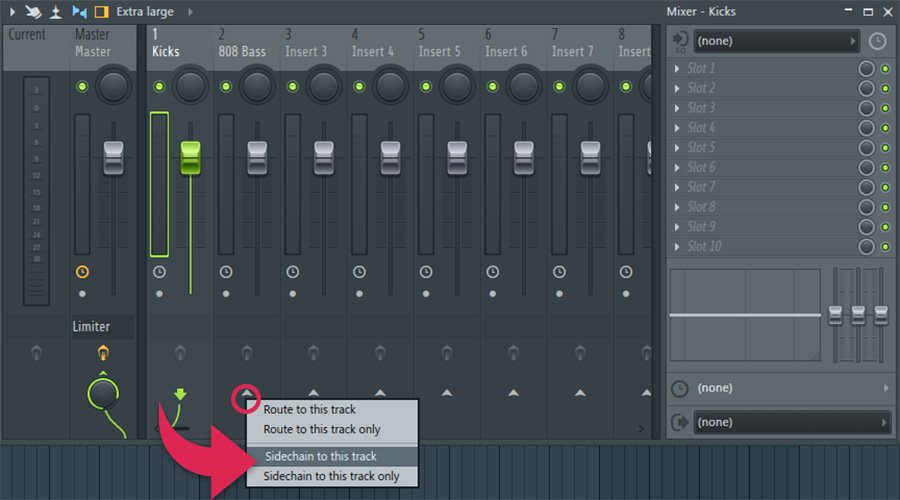
Route the Kick to the Bass: In the Mixer, select the kick track (Mixer Track 1). Right-click the send control (little up arrow) at the bottom of the bass track (Mixer Track 2) and choose “Sidechain to this track.” A thin green wire will appear between these two channels. This sends the kick signal to the bass track for sidechaining purposes without affecting its audio signal.

Step 3: Insert Fruity Limiter on the Bass Track

- Add Fruity Limiter: On the bass track (Mixer Track 2), insert Fruity Limiter in the first available effects slot.
- Configure Fruity Limiter for Sidechain Compression: Open Fruity Limiter and switch to the COMP (compression) tab. Under the sidechain section, select the kick drum (Mixer Track 1) as the sidechain input. This option is available under the “Sidechain” dropdown menu in the compressor section of Fruity Limiter.
Step 4: Adjust Compressor Settings

- Threshold: Set the threshold to a level where the compressor engages when the kick hits. Start around -10 dB and adjust as needed.
- Ratio: Set the ratio to a value that provides noticeable compression. A starting point could be 4.0:1, offering a balance between subtlety and impact. Now you should see visually how the compressor started to attentuate the bass when the kick hits.
- Attack: Set a fast attack time to ensure the compressor engages quickly when the kick hits. An attack time of around 1 ms is usually effective, or you can leave it by default at 0 ms.
- Release: Set the release time to control how quickly the compressor stops compressing after the kick has hit. A release time of around 100-150 ms is a good starting point.
- Knee: Adjust the knee control setting to control how gradually the compression starts. A soft knee can make the compression more musical and less abrupt.
Step 5: Fine-Tune the Settings
- Play the Track: Play your track and listen to how the kick and bass interact.
- Adjust Threshold and Ratio: If the bass is not ducking enough, lower the threshold or increase the ratio. If the bass is ducking too much, raise the threshold or decrease the ratio.
- Tweak Attack and Release: Adjust the attack and release times to ensure the compression feels smooth and fits the rhythm of your track.
- Check the Mix: Continuously listen in the context of the entire mix to ensure the sidechain compression enhances the track without making the bass sound unnatural or over-compressed.
Step-by-Step Guide to Sidechain Compression in FL Studio Using the Peak Controller
Step 1: Load Your Samples
As in the above example, you need to load your kick drum sample and the bass into separate channels in the Channel Rack. Route the kick to Mixer Track 1 and the bass to another empty mixer track, such as Mixer Track 2.
Imporntat! You don’t have to do any routing settings between the mixer channels, the whole sidechaining process will be done by the Peak Controller plugin.
Step 2: Analyze Frequencies

- Kick Channel: Insert ‘Fruity Parametric EQ 2’ on the kick channel to observe its frequency spectrum. Identify the main frequency range of the kick, typically around 50Hz, in this case. This EQ will be used just for monitoring.
- Bass Channel: Insert ‘Fruity Parametric EQ 2’ on the bass channel. Confirm the frequency range where the kick and bass overlap. This EQ will do the hard job of sidechaining.
Step 3: Set Up Peak Controller

- On the kick channel, add ‘Fruity Peak Controller’ from the effects section.
- Ensure the ‘Base’ dial is set to 50%, and set the Peak Volume ‘VOL’ knob to +10, or +15%.
- Keep other settings at their default values for now.
Step 4: Link EQ to Peak Controller

- Go to the bass channel and select a node in ‘Fruity Parametric EQ 2’ that corresponds to the frequency where the kick hits hardest (around 50Hz).
- Right-click the gain slider of this EQ node and select ‘Link to controller.’
- In the ‘Internal controller’ section, choose ‘Peak ctrl – Peak’ from the kick channel.
- Set the ‘Mapping formula’ to ‘Inverted.’
When you play the kick and bass together, you should see the EQ node dip according to the kick’s rhythm. This means the bass frequency at 50Hz is attenuated whenever the kick hits, without affecting the entire bass signal.
Fine-Tuning Your Sidechain Compression
- Volume Control: Adjust the volume dial in the Peak Controller to change the depth of the EQ dip.
- EQ Control: Use a “Bell” also known as “Peaking” or “Low Shelf” EQ curve to be more selective on the wanted frequencies.
- Decay Control: Adjust the decay to change how quickly the EQ returns to its normal level after the kick hits.
These adjustments help you achieve a more cohesive and subtle sidechain effect, ensuring your low-end frequencies remain clean and clear.
Additional Tips
- Enhance Mid Frequencies: Consider boosting the bass frequencies between 100Hz and 200Hz where the harmonics of the bass notes hit. This can add clarity and cohesion between the kick and bass.
- Experiment with Other Effects: You can apply multiband sidechain compression in various creative ways. Experiment with different settings to find what works best for your mix.
Which Method is Best?
The best method for sidechain compression in FL Studio depends on your specific needs:
Use the Fruity Limiter if you need precise control over the compression parameters and want visual feedback on the compression action. This method is ideal for detailed and versatile sidechain compression tasks.
Use the Peak Controller if you need a quick setup and want to target specific frequency ranges. This method is great for creating rhythmic effects and managing low-end frequencies without affecting the entire signal.
Both methods are powerful tools in FL Studio, and understanding when to use each can help you achieve the best results in your music production. Experiment with both to see which one suits your workflow and the needs of your mix.
If you still think that the whole mixing thing is complicated and you want to focus on the creative process, then send your project to us and we will mix and master everything for you as it should be.
Our team of audio engineers has over 15 years of experience and works with most programs such as FL Studio, Logic Pro, Cubase, Studio One, etc. See here our online mixing and mastering services.
Also, be sure to check our FL Studio Drum Mixing Presets and FL Studio Vocal Mixing Presets Pack
Disclaimer: Any references to any brands on this website/webpage, including reference to products, trademarks, brands and companies, are provided for description purposes only. We don't have any association with or endorsement by these brands or companies. Some of the links on our blog may be affiliate links. This means if you click on these links and make a purchase, we may earn a commission at no extra cost to you.
Need Professional Mixing & Mastering?
You may also like to read...
How to Use Waves Vocal Rider – A Step-by-Step Guide
How To “Glue” Your Mix Using the SSL Bus Compressor by Waves
10 Best Headphones for Studio Recording, Mixing, & Mastering
Mastering Your Tracks at -14 LUFS: Good or Bad?
Mastering Dynamics: How To Use The Waves MV2 Plugin
The Importance of Reference Tracks in Mixing & Mastering