Mastering
Mastering Basics: Essential EQ and Compression Tips
In any creative process, following the correct order of operations is essential to achieve optimal results, and mastering music is no exception. The first phase of mastering that every mix should undergo involves careful observation, treatment, and restoration.
This phase is crucial as it lays the groundwork for a clean and polished final product. By focusing on corrective EQ techniques and strategic compression, you can address any issues and enhance the overall quality of your mix.
This step-by-step guide will walk you through the initial processes needed to prepare your track for professional mastering.
1. How to Perform Frequency Cuts with EQ
In mastering, start with a simple EQ step to perform frequency cuts (END) to clean up the sound of your song before moving on to the next step.
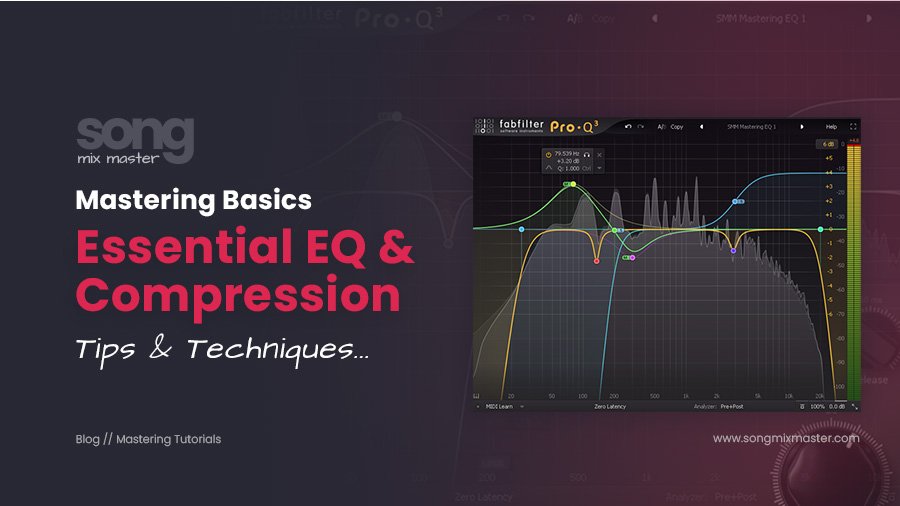
First, load your mixed track into your DAW, and place it on any mixer channel or you can even use the Master Bus. Then, load an EQ plugin; we use the FabFilter Pro Q3, but any EQ will work.
Perform two frequency cuts: a low cut set between 20 and 30 Hz and a high cut at 20,000 Hz. Both cuts should have a slope of 24 dB per octave.

Even though these frequencies are almost inaudible, failing to cut them can introduce noise that affects the audible parts of your mix. These cuts help stabilize the frequency range of your song.
2. Mid/Side EQ During Mastering
Mid/Side EQ is a crucial process that can significantly improve your track. Using FabFilter Pro Q3, start by identifying the busiest part of your song with the most instruments and harmonic elements, as this will be your reference point for mastering.
Select a point on the EQ and switch the mode to Side. Perform a low cut between 150 and 250 Hz to clean up low frequencies from the stereo field, using a 24 dB per octave slope.

Additionally, boost around 2000 to 3000 Hz with a wide bandwidth to add a characteristic brightness to the sides of your mix.

Next, change the mode to Mid and select a point between 300 and 500 Hz. This range often makes tracks sound muddy, so reduce it slightly to increase clarity by removing unwanted frequencies.
3. Detecting and Removing Resonances with EQ
Detecting and removing resonances is a crucial step to achieving a clean mix. To identify resonances, create a narrow bell EQ with a high Q factor and sweep it across the frequency spectrum while listening carefully.
This will exaggerate resonances, making them easier to detect. Once found, reduce the gain of these resonances with a narrow bandwidth to avoid affecting adjacent frequencies.

You can also directly cut any resonances or sibilances if you have a trained ear by creating a narrow bell with negative gain and adjusting until the problematic frequencies are eliminated.
Resonances usually occur in the mid, mid-low, and low frequencies, but they can appear anywhere in the spectrum.

Important! Don’t forget that during the Mastering phase, you don’t have to make very drastic changes using the EQ. +/- 1-2 db is enough. If you still notice problems, they should be solved in the audio mixing stage.
Also see: 7 Steps to the Perfect Mix in Hip-Hop, Techno, Rock, and Pop
4. Applying Glue Compression for a Compact Mix
After completing frequency cuts, Mid/Side EQ, and resonance removal, it’s time to make your mix sound more cohesive. Achieve this “glue” effect with stereo optical compression, which also imparts an analog touch to digitally produced tracks.
Also see: Glue Compression & Best Glue Compressors for Mastering
Using an optical compressor, such as the TR5 Opto Comp (or the bx_opto Compressor by Brainworx can work as well), set the output to zero, slightly increase the ratio and compression, and apply a fast attack with a medium release.

Aim to compress around 1 dB, not exceeding 2 dB, to control peaks. Then, raise the output to compensate for the compressed gain.
This subtle step helps prepare your track for further processing, allowing it to achieve higher volumes and sound more natural and realistic.
Also read: How To “Glue” Your Mix Using the SSL Bus Compressor by Waves
If you have not yet mastered all these techniques and it seems too complicated, then consider our professional audio mastering services.
Disclaimer: Any references to any brands on this website/webpage, including reference to products, trademarks, brands and companies, are provided for description purposes only. We don't have any association with or endorsement by these brands or companies. Some of the links on our blog may be affiliate links. This means if you click on these links and make a purchase, we may earn a commission at no extra cost to you.
Need Professional Mixing & Mastering?
You may also like to read...
Exploring the Best DAWs for Music Production
Top 30 Best Mastering Audio Plugins In 2024
How To Use a Pultec EQ For Warm And Punchy Sound
How to Use a De-Esser to Reduce Sibilance in Vocal Mixing
How To “Calculate” The Compressor Release Time Correctly
Analog vs. Digital Mixing: A Sound Engineer’s Perspective